Tampilkan postingan dengan label Tips or Tricks Windows. Tampilkan semua postingan
0

Windows Login Langsung Logoff

Kebetulan Computer bagian service MITO rusak yaitu saat login windows tiba-tiba langsung logoff alias tidak bisa masuk sama sekali, mau diformat takut datanya pada hilang, mau di scan virus takut otomatis delete memang terjadi kerusakan ini biasanya karena virus, :D virus terus disalahkan.
Ok langsung saja solusinya, silahkan jalankan solusi dibawah ini :

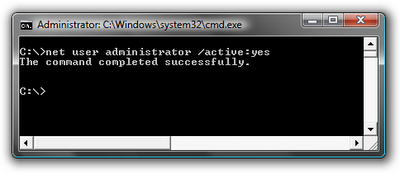
1. Boot pake cd installer windows xp / Linux
2. Masuk recovery console-> command prompt / ( Explorer Linux )
3. Masuk ke direktori C:/windows/system32
4. Ketik "copy userinit.exe wsaupdater.exe" tanpa kutip, jika tidak ada copy dari cpu lain atau cari difolder lain.
5. Restart (ctrl+alt+del buat restart). seharusny sudah bisa login 
6. Masuk Windows pilih Start > Run > Regedit
7. Cari direktori berikut HKEY_LOCAL_MACHINE\SOFTWARE\Microsoft\WindowsNT\CurrentVersion\Winlogon\
8. Edit "String Userinit" dari "C:\WINDOWS\System32\wsaupdater.exe" menjadi: "C:\WINDOWS\System32\userinit.exe"

Selamat mencoba ya. :D
Source: kaskus
0

Cara Login Administrator Windows 7

Yap X Liong Senin, 12 Desember 2011 , , , ,

Cara Login Administrator di Windows 7 dan Vista. Banyak orang yang sudah tahu bagaimana cara login administrator di windows XP. Terus bagaimana Cara Login Administrator di Windows 7 dan Vista. Apakah account Administrator juga ada di windows 7 dan vista ?

Windows 7 dan Vista sebenarnya juga punya account Administrator, akan tetapi karena account Administrator tersebut tidak aktif (defaultnya), maka kita tidak akan bisa menggunakannya sebelum account Administrator tersebut di aktifkan. Dengan aktifnya account administrator tersebut, maka kita akan bisa login ke Administrator.

Bagamana Cara Login Administrator di Windows 7 dan Vista ?
Cara Mengaktifkan Account Administrator di Windows 7 dan Vista :

Pertama, Login sebagai account user yang biasa Anda pakai. Kemudian jalankan perintah Command Prompt sebagai administrator di windows 7 / Vista dengan mengklik kanan dan memilih "Run as administrator".


Sekarang ketik perintah berikut:
net user administrator /active:yes


Anda akan melihat pesan bahwa perintah berhasil diselesaikan. kemudian Log out, dan sekarang Anda akan melihat account Administrator sebagai pilihan. (Catatan : screenshot ini dari Windos Vista, tapi ini bekerja juga di Windows 7)


Kemudian untuk login Administrator di Windows 7 / Vista ini, Anda bisa langsung klik account Administrator yang tampil.

Catatan : Account Administrator ini belum terpassword jadi Anda bisa langsung login Administrator tanpa password.

Kemudian bagaimana caranya agar Accoun Administrator ini tidak tampil lagi?

Cara Menonaktifkan Account Administrator di Windows 7 dan Vista :

Pertama, Login sebagai account user yang biasa Anda pakai. Kemudian jalankan perintah Command Prompt sebagai administrator di windows 7 / Vista dengan mengklik kanan dan memilih "Run as administrator".

Sekarang ketik perintah berikut:
net user administrator /active:no


Account Administrator sekarang akan dinonaktifkan, dan tidak akan muncul lagi pada layar login windows 7 dan Vista.

Selamat mencoba.
0

Cara Delete Menghapus Virus Autorun

Yap X Liong Minggu, 11 Desember 2011 , , , , ,
Cara Mudah Cepat Menghapus Virus AutoRun.Inf Tanpa AntivirusVirus AutoRun.Inf adalah virus yang biasanya menyerang komputer/laptop melalui media usb flashdisk. Biasanya virus ini membentuk shortcut yang kalau dibiarkan akan sangat memberatkan komputer karena jika shortcut tersebut berkembang biak di komputer akan menyebabkan besar space hardisk komputer menjadi cepat penuh.

Cara Cepat dan Mudah Untuk Menghilangkan Virus autorun.inf  :

  1. Pastikan bahwa system restore pada windows xp/windows7 anda sudah dinonaktifkan agar ketika file tersebut sudah dihapus tidak kembali lagi setelah restart. (My Computer->Properties->System Restore)
  2. Jalankan Boot komputer dengan modus Safemode.
  3. Jalankan aplikasi Command Prompt (Klik logo Start Menu > Run > Ketik : cmd.exe)  atau (Start > All Programs > Accessories > Command Prompt)
  4. Ketikan CD\ kemudian tekan [Enter] agar dipaling awal
  5. Ketikkan drive USB tersebut (misalnya E: kemudian tekan [Enter])
  6. Ketikan CD\ kemudian tekan [Enter] agar dipaling awal
  7. Ketikkan ATTRIB -R -A -S -H AUTORUN.INF, kemudian tekan [Enter]
  8. Ketikkan “DEL AUTORUN.INF /S /F” tanpa tanda petik, kemudian tekan [Enter]
  9. Setelah selesai, komputer dapat di Restart dalam mode Normal.
  10. Jalankan antivirus kalau bisa pakai avast dengan mode scan via booting windows
  11. Jangan lupa hidupkan kembali system restore jika komputer telah normal
Penjelasan:
ATTRIB adalah modul yang dipergunakan untuk mengubah atribut sebuah file.
  • R adalah perintah untuk menghilangkan mode “Read Only”
  • A adalah perintah untuk menghilangkan mode “Archive”
  • S adalah perintah untuk menghilangkan mode “System”
  • H adalah perintah untuk menghilangkan mode “Hidden”
  • DEL adalah perintah untuk menghapus file
Source: carasetting + my edit
0

Membuat Installer Windows 7 dengan FD

Cara membuat installer windows 7 dengan Flashdisk (FD) USB. Cara tutorial ini akan menggunakan sebuah software gratis yaitu koala. software ini memungkinkan untuk membuat bootable Flashdisk USB thumb drive installer untuk Windows 7, Windows Vista dan Windows Server System 2008. Kalo untuk windows XP belum dicoba.

Cara Membuat Bootable Flashdisk USB Drive Installer untuk Windows 7
Koala membuat bootable USB dari CD Windows bukan file ISO. Maka untuk menciptakan sebuah installer bootable USB thumb drive, Sobat membutuhkan komputer yang menjalankan Windows (Windows XP atau yang lebih baru), DVD untuk OS Windows yang ingin dibuat USB bootable installer (Windows 7, Vista, Windows Server System 2008) , NET framework. 2.0 atau yang lebih tinggi dan USB flashdisk dengan kapasitas min. 4 GB.

Berikut caranya :
  1. Download Koala disini. 
  2. Masukkan DVD untuk Windows 7 (atau Vista atau Windows System 2008) ke dalam optical drive PC.
  3. Masukkan flashdisk (USB thumb disk atau pen disk) dengan kapasitas 4GB ke dalam drive USB PC.
  4. Jalankan program Koala.

Software Koala
  1. Click Scan pada bagian Source untuk melakukan scan source (optical drive) OS yang akan dijadikan installer bootable USB.
  2. Click Scan pada bagian Destination untuk melakukan scan drive USB yang akan dijadikan installer bootable.
  3. Click tombol Start untuk memulai proses pembuatan installer bootable USB untuk Windows.

+/- 10 menit, sebuah installer bootable USB thumb drive sudah siap untuk melakukan instalasi Windows 7 (atau Vista, windows Server System 2008)!!!

Source: sandydoank12
0

Cara Aktifkan NetMeeting Windows XP

Yap X Liong Rabu, 19 Oktober 2011 , , , , ,
Dengan NetMeeting, Anda dapat melakukan rapat virtual, berbagi data maupun mengerjakannya bersama-sama. netMeeting sebenarnya sudah ada dalam komputer ketika Anda melakukan full install Windows XP, tetapi tidak muncul di menu Start bila tidak diaktifkan.

1. Klik Start, dan pilih Run.
2. Ketikkan Conf, lalu klik OK.
3. Di NetMeeting Wizard, masukkan informasi yang diminta; minimal First name, Last name dan E-mail address. Klik Next.
4. Jika Anda ingin orang lain dapat melihat Anda di direktori, centang Log on to a directory server when NetMeeting starts. Klik Next.
5. Pilih kecepatann koneksi Anda di jaringan. Klik Next.
6. Centang Put a shortcut to NetMeeting on my desktop (atau on my Quick Launch bar). Klik Next.
7. Berikutnya, kita akan masuk ke Audio Tuning Wizard. Klik Next.
8. Tentukan peranti untuk Recording dan Playback. Klik Next.
9. Uji suara dengan mengklik Test. Geser slider ke tingkatan volume yang Anda inginkan. Bila sudah puas, klik Next.
10. Sekarang, uji fungsi mikrofon dengan membaca teks yang tersedia. Geser slider ke volume yang Anda inginkan. Bila sudah sesuai, klik Next.
11. Klik Finish untuk menyelesaikan Wizard.

NetMeeting akan aktif, dan siap digunakan. Untuk selanjutnya, aplikasi ini sudah muncul di daftar menu Start.
0

Network Connection dan Device Manager Kosong XP

Yap X Liong Selasa, 11 Oktober 2011 , , , , , ,
Saat selesai scan dan clean antivirus ternyata icon Local Area Connection lenyap, diperiksa di Control Panel > Network Connection > Kosong, tapi anehnya internet bisa jalan. Coba ke device manager ternyata juga tidak ada daftar hardware sama sekali. bener-bener mantap virus w32.Pilleuz + Trojan.

Solusinya :
1.Verify the network adapter setting:

a. Right-click My Computer, and then click Properties.

b. Click the Hardware tab, and then click Device Manager.

c. Expand Network Adapters, and then verify that the correct network adapter is listed.

d. Double-click the network adapter, and then verify that the "This device is working properly" message appears in the Device status box on the General tab.


2. Verify that necessary services are started:

a. Right-click My Computer, and then click Manage.

b. Expand Services and Applications, and then click Services.

c. In the right pane, verify that the following services are started:

• Remote Procedure Call (RPC)
0

Solusi Trouble pada Komputer atau Laptop

Yap X Liong Kamis, 15 September 2011 , , , , , , ,
Sekedar tips yang mungkin berguna bagi temen-temen yang tiap harinya bekerjasama dengan pc, bagaimana cara mengatasi pc / laptop yang mngalami trouble. Langsung ke pokoknya saja tidak usah berbelit-belit.

Komputer Tidak Mau Hidup
- Cek koneksi kabel (dari power outletnya ke tombol power pada PC)
- Cek apakah stabilizer berfungsi atau tidak (jika memakai stabilizer)
- Cek kabel power pada CPU
- Jika masih juga tidak mau hidup permasalahanya mungkin terletak pada power supply atau MB

Komputer Mau Hidup Tetapi Tidak Mau Booting
- Kenali Terlebih dahulu Bunyi Beep:
Beep 1 kali saja, tanda bahwa kondisi komputer baik
Beep 1 kali, panjang, terdapat problem di memory
Beep 1 kali panjang dan 3 kali pendek, kerusakan di VGA card
Beep 1 kali panjang dan 2 kali pendek, kerusakan di DRAM parity
Beep terus menerus, kerusakan dimodul memory atau memory video
- Cek dengan menggunakan software diagnosa seperti sisoft sandra, PC mark04, PC mark05 dll

Komputer Mau Booting Tetapi Selalu "Safe Mode" (untuk masuk ke safe mode tekan F8)
0

Cara Cepat Ganti Nama Banyak File pada Folder

Yap X Liong Selasa, 12 Juli 2011 ,
If you want to rename multiple files in the same directory:
  1. Using the Windows Explorer, select all the files you want to rename
  2. Press F2 or right click and select Rename
  3. Enter the prefix for the name you want (e.g. Newname)
  4. This will automatically rename the rest of the files Newname (1).jpg, Newname (2).jpg etc.
  5. Make sure you include the extension if you have the Explorer configured to show them.
0

Mempercepat Loading or Booting Windows XP

Microsoft has made available a program to analyze and decrease the time it takes to boot to WindowsXP
The program is called BootVis
  1. Uncompress the file.
  2. Run BOOTVIS.EXE
  3. For a starting point, run Trace / Next Boot + Driver Delays
  4. This will reboot your computer and provide a benchmark
  5. After the reboot, BootVis will take a minute or two to show graphs of your system startup.
  6. Note how much time it takes for your system to load (click on the red vertical line)
  7. Then run Trace / Optimize System
  8. Re-Run the Next Boot + Drive Delays
  9. Note how much the time has decreased
  10. Mine went from approximately 39 to 30 seconds
0

Repair HAL.DLL Missing or Corrupt

Yap X Liong Sabtu, 09 Juli 2011 , , ,
If you get an error regarding a missing or corrupt hal.dll file, it might simply be the BOOT.INI file on the root of the C: drive that is misconfigured
  1. Insert and boot from your WindowsXP CD.
  2. At the first R=Repair option, press the R key
  3. Press the number that corresponds to the correct location for the installation of Windows you want to repair.
    Typically this will be #1
  4. Type bootcfg /list to show the current entries in the BOOT.INI file
  5. Type bootcfg /rebuild to repair it
  6. Take out the CD ROM and type exit
0

Repair NTLDR or NTDETECT.COM Not Found

If you get an error that NTLDR is not found during bootup,
If you have FAT32 partitions, it is much simpler than with NTFS.
Just boot with a Win98 floppy and copy the NTLDR or NTDETECT.COM files
from the i386 directory to the root of the C:\ drive.
For NTFS:
  1. Insert and boot from your WindowsXP CD.
  2. At the first R=Repair option, press the R key
  3. Press the number that corresponds to the correct location for the installation of Windows you want to repair.
    Typically this will be #1
  4. Enter in the administrator password when requested
  5. Enter in the following commands (X: is replaced by the actual drive letter that is assigned to the CD ROM drive.
    COPY X:\i386\NTLDR C\:
    COPY X:\i386\NTDETECT.COM C:\
  6. Take out the CD ROM and type exit
0

Mencari IP Address Sebuah Domain

Yap X Liong Rabu, 05 Januari 2011 , ,
Apakah anda tahu IP address domain seseorang, nah jika anda belum mengetahuinya cara mencari IP address dari sebuah domain anda bisa lakukan langkah ini dengan mudah cukup menggunakan program dari bawaan Windows.
Langkahnya sebagai berikut buka program command prompt caranya klik run pada start menu lalu ketik cmd atau takan logo Windows+R pada keyboard. Pada jendela command prompt ketikan nslookup misal situs yang akan saya cari alamat IP address dengan menggunakan domain adalah ” www.facebook.com” jadi perintahnya menjadi
nslookup www.facebook.com
Cara mencari IP address dari sebuah domain menggunakan command prompt
0

Solusi Error Upgrade SP3 WinXP

Yap X Liong Senin, 13 Desember 2010 , ,

Jika ingin upgrade Windows XP ke SP3, perlu installernya yang dapat di download dklik disini

Sebagai catatan besar filenya yah sekitar 320 MB dengan format file .exe, sehingga perlu diperhatikan kecepatan koneksi internetnya. hehehe88x

Setelah proses download selesai, lakukan proses installasi seperti menginstall program aplikasi lainnya. Tunggu beberapa menit, tergantung spesifikasi komputer.

Apabila keluar error pesan : “Windows has detected that one or more protected core system files (kernel)…..see Knowledge Base article Q327101…..” nah ini sering menjadi pertanyaan bagi yang pernah menjumpai pesan msgbox seperti ini, jangan kawatir , ada solusi nya :)

Pertama tama hal itu disebabkan karena adanya configurasi video oleh software third-party yang mengkonfigurasi BootXP atau LogonUI.
Untuk menangani hal ini dapat dilakukan cara sebagai berikut :

0

Kill Proses Dari DOS Prompt

Untuk menghentikan proses (aplikasi dan service) yang sedang berjalan pada Windows saya yakin
Anda sering melakukannya dari Windows Task Manager.
Selain cara tersebut, ada cara lain yang dapat Anda lakukan yaitu dengan melalu Dos Prompt Caranya adalah sebagai berikut:
  1. Masuk ke dos prompt dengan mengetikkan cmd dari menu Start – Run.
  2. Tulis tasklist dan tekan enter, maka akan tampil daftar proses yang sedang berjalan seperti gambar paling bawah
  3. Cari nama proses yang ingin Anda stop, lalu cari nomer PID-nya.
  4. Misalnya Anda ingin menghentikan program Firefox, maka tulis: tskill 1844, lalu tekan enter.
  5. Selesai
0

How to Crack Terminal Services

HOW TO RESET WINDOWS TERMINAL SERVICES 3 MONTH TRIAL
Warning: greyhat content.

Thanks to a Microsoft article, I've found out that it is very easy to extend your Windows Terminal Services 3-month trial or experience time. It's so easy that I'm sure many administrators have done this in their own systems, while waiting for their managers or financial staff to buy the definitive licenses (not being hypocrite here).

Following these instructions, you don't have to crack any program. You won't mess with your system. The magic is to only delete the licenses databases both in the server and the clients, and let windows re-create them for you.

----

Make sure you've installed "Terminal Services Licensing". By the way, this method only makes sense if you need to use Terminal Services in Application Mode, which is the one that requires licensing.

The idea is quite simple.

First, disconnect all users from the terminal. If you need to do this remotely, you can also disconnect yourself, and access the files remotely.
  1. Go to %WINDIR%\system32\lserver
0

Terminal Server User Access permissions

Sudden "...you must have Terminal Server User Access permissions on this computer." Error.

I have a Small Business Server 2003 R2 Server running Team Foundation Server tucked out of the way to conserve desk space (three servers, two clients, two desks: not much space).  I don't have it hooked up to a monitor (one: don't have that many monitors, and two: desk space).  So, I've been merrily using Remote Desktop Connection (RDC) in Windows XP to connect to this server to perform my various administration tasks (like install service packs, hot fixes, etc.).
Well, I finally had a couple of cycles to install some hotfixes for the new daylight savings time changes to various components, so I sparked up RDC to get the ball rolling on my server--as I have done many times before.  I was greeted with a message box as I logged in:
To log on to this remote computer, you must have Terminal Server User Access Permissions on this computer. By default, members of the Remote Desktop group have these permissions. If you are not a member of the Remote Desktop Users group or another group that has these permissions, or if the Remote Desktop User group does not have these permissions, you must be granted these permissions manually.
Needless to say I was dumbfounded--it worked fine yesterday.  After a bit of searching, it appears it was the 120 day anniversary of creating this server and Terminal Server (which is what is used for an application server in Small Business Server) had "expired" (i.e. its grace period for CALs had expired).  I was used to installing Windows Server and setting up Terminal Server for remote administration (there was a setting for that in Windows Server, I honestly don't remember what Small Business Server asked me when I installed; it certainly wasn't clear it was different the other Windows Server installation processes).  Apparently I missed the memo that remote administration is now called "Remote Desktop".  Clearly a WTF moment.
As it turns out, the hoops to get back to the ability of remote administration aren't clearly documented (I actually couldn't find any documentation on the process, I actually inferred the process from various non-Microsoft sources--there could be documentation somewhere, I just didn't find it).  The process requires that Terminal Server be uninstalled, the server rebooted, and Remote Desktop be re-enabled.  A point-list of the steps:
  1. Run Add/Remove Programs (run "appwiz.cpl")
  2. Click Add/Remove Windows Components (Alt-W)
  3. Uncheck Terminal Server
  4. Press Next>.
  5. Follow instructions, including rebooting.
  6. Open System control panel applet (run "sysdm.cpl")
  7. Click Remote tab.
  8. Check Enable Remote Desktop on this computer. (because removing Terminal Server disables this)
  9. Click Select Remote Users...
  10. Make sure administrators is in the list.
  11. Click OK.
  12. Click OK. for the next dialog.
  13. Wait a few minutes for things to get up and running and you're no ready for remote administration again.
I hope this helps someone get back up and running faster than I did...
 
Source: PeterRitchie
0

Cara Mencari Wallpaper di Google

Yap X Liong Senin, 29 November 2010 , , ,
wallpaper dg google images
Wallpaper selain sebagai hiasan di desktop komputer, kadang bisa menumbuhkan “semangat baru” ketika bekerja di depan komputer. Tampilan yang monoton (selalu sama) mudah menimbulkan kejenuhan, sehingga terkadang kita perlu tampilan wallpaper yang baru dan segar. Di Internet kita bisa mendapatkan begitu banyak wallpaper.
Salah satu caranya dengan Google Image Search. Bagaimana cara mudah mencari gambar wallpaper dengan Google ?


0

Install 2 WindowsXP satu PC

Yap X Liong Jumat, 26 November 2010 ,
Install 2 Windows XP
Mungkin masih banyak yang belum tahu jika kita bisa menginstall 2 Windows XP yang sama dalam satu PC (komputer). Misalnya di install di drive C: dan D:. Tetapi mengapa repot-repot install 2 Windows XP ? Ada beberapa manfaat yang bisa didapatkan ketika kita menginstall 2 Windows XP, meskipun juga ada kekurangannya.
Berikut akan dibahas secara singkat tentang Install 2 Windows XP dalam satu PC.

Manfaat yang bisa didapatkan dengan menginstall 2 Windows Xp dalam satu PC antara lain :
  • Untuk mencoba aplikasi atau software tertentu, misalnya ingin mencoba antivirus yang berbeda.
  • Install aplikasi dengan versi yang berbeda. Terkadang ada aplikasi dengan 2 versi yang berbeda tidak bisa di install dalam satu Windows, dilain pihak kita masih tetap memerlukan kedua versi tersebut.
  • Melakukan scan virus dari salah satu Windows. Jika windows yang satu terkena virus, maka kita memilih windows yang satunya dan discan dari sana. Meski tidak menutup kemungkinan dua-duanya terkena virus, tetapi biasanya virus hanya aktif di satu windows saja.
  • Sebagai alternatif jika salah satu windows bermasalah.
  • Melakukan berbagai pengujian /testing lainnya.
  • Memperbaiki jika satu windows tidak bisa booting.
  • Mencoba 2 versi windows XP yang berbeda, misalnya Home Edition dan Professional Edition.
Meskipun begitu, tetap saja ada kekurangannya, antara lain :
  • Menambah penggunaan hardisk space (drive)
  • Mengulangi Installasi program/aplikasi, update, driver dan lainnya.
Meskipun sebagian cara diatas bisa juga menggunakan software Virtualisasi, seperti VirtualBox , tetapi dengan virtualisasi kinerja tidak akan maksimal dan akan tergantung dengan software virtualisasi sendiri.
Ketika menginstall 2 Windows XP dalam satu komputer, maka sebaiknya windows kedua tidak di install dengan berbagai macam program/aplikasi, mungkin hanya driver standard, antivirus dan beberapa aplikasi penting lainnya, sehingga kinerjanya ringan. Sedangkan satunya lagi bisa di install berbagai macam, dan ini mungkin yang dijadikan Sistem operasi utama.

Cara Install Windows XP Kedua

Sebelum menginstall, siapkan partisi yang kosong terlebih dahulu. Jika windows yang satu sudah di install ada di drive C:, maka bisa menggunakan drive lainnya, misalnya drive D: atau drive yang lainnya. Pastikan data-data sudah diamankan terlebih dulu.
Karena Windows XP kedua tidak akan digunakan untuk banyak aplikasi/program, maka ukuran Drive juga tidak perlu terlalu besar, mungkin sekitar 5 GB saja sudah cukup. Atau itu juga terserah kebutuhan kita saja.
Proses Installasi seperti install windows biasa, yaitu :
0

Tips mengatasi Printer yang bandel

Yap X Liong Selasa, 23 November 2010 ,
Bagi kita yang sering mencetak dokumen atau apa saja dengan printer, terkadang mengalami masalah membandel-nya proses mencetak. Ketika mencetak beberapa dokumen, kemudian dokumen pertama gagal (error) biasanya printer berhenti mencetak, antrian data tidak mau dihapus dan kadang komputer harus di restart untuk memulai mencetak lagi.
Dengan program kecil dan gratis, Stalled Printer Repair, kita bisa mengatasi hal tersebut dengan mudah.


Proses mencetak ke printer bisa terhenti karena berbagai sebab, seperti data yang rusak ketika dikirim ke printer atau proses printing yang tidak lengkap di kirim aplikasi tetapi tidak bisa di hapus. Sehingga daftar antrian cetak berikutnya tidak akan bisa dijalankan. Hal ini biasanya di kenal dengan istilah Stalled/Stuck Print Job.

Dengan Stalled Printer Repair, kita bisa menghapus semua daftar antrian di printer, kemudian mengulangi proses printing tanpa harus restart komputer. Beberapa fitur aplikasi ini antara lain:
  • Mendeteksi adanya Stalled Print Jobs
  • Menghapus semua daftar antrian yang tidak bisa di print.
  • Aplikasi bersifat portable, tidak perlu di install dan tidak menulis di registry
Stalled Printer Repair ( 346 KB). Cara penggunaannya sangat mudah. Setelah download, buka zip kemudian jalankan programnya. Jika ada Antrian di print maka akan ditampilkan seperti gambar di atas. Kemudian jika ingin menghapus semua antrian tersebut, klik Purge Print Jobs. Selanjutnya kita bisa mengulagi proses printing.
Download StalledPrinterRepair.zip

Menghapus “Stalled Print Jobs” secara manual

Selain dengan program di atas, kita bisa menghapus daftar antrian yang tidak bisa di cetak (print) dengan cara manual sebagai berikut :
  1. Buka Control Panel > Administrative tools> Service
  2. Cari “service” yang namanya Print Spooler kemudian klik kanan dan pilih Stop. Jangan ditutup dulu window Service
  3. Buka folder Windows sistem, biasanya di C:\WINDOWS\system32\spool\PRINTERS
  4. Hapus semua file yang ada di folder tersebut. File basanya dengan ekstensi *.spl dan *.shd
  5. Setelah semua dihapus, seperti langkah no 2, tetapi klik kanan Print Spooler dan pilih Start
  6. Ulangi proses printing dokumen
Selain dengan dua cara diatas, satu lagi dengan file batch file. Download Printer.bat (249 bytes), kemudian  setelah di download ganti EXE menjadi BAT, kemudian jalankan langsung. File ini berisi perintah MS-DOS (command prompt) untuk menjalankan penghapusan antrian printer seperti langkah manual diatas.
Referensi :
- Megaleecher
- fantasticfreeware
0

Ms Access File sharing lock count exceeded

When one or more users process many transactions in a multi-user environment, the transactions may fail with the following error message: File sharing lock count exceeded. Increase MaxLocksPerFile registry entry.

Method 1: Set the registry key to MaxLocksPerFile to increase the maximum number of locks per file

  1. Click Start, and then click Run.
  2. Type regedit, and then click OK.
  3. Use the appropriate method:
    • In Microsoft Access 2000, in Microsoft Access 2002, and in Microsoft Office Access 2003 that are running on a 32-bit Windows operating system, use Registry Editor to locate the following registry key:
      HKEY_LOCAL_MACHINE\SOFTWARE\Microsoft\Jet\4.0\Engines\Jet 4.0

      In Microsoft Access 2000, in Microsoft Access 2002, and in Microsoft Office Access 2003 that are running on a 64-bit Windows operating system, use Registry Editor to locate the following registry key:
      HKEY_LOCAL_MACHINE\SOFTWARE\Wow6432Node\Microsoft\Jet\4.0\Engines\Jet 4.0
    • In Microsoft Office Access 2007 that is running on a 32-bit Windows operating system, use Registry Editor to locate the following registry key:
      HKEY_LOCAL_MACHINE\SOFTWARE\Microsoft\Office\12.0\Access Connectivity Engine\Engines\ACE

      In Microsoft Office Access 2007 that is running on a 64-bit Windows operating system, use Registry Editor to locate the following registry key:
      HKEY_LOCAL_MACHINE\SOFTWARE\Wow6432Node\Microsoft\Office\12.0\Access Connectivity Engine\Engines\ACE
  4. In the right pane of Registry Editor, double click MaxLocksPerFile.
  5. On the Edit DWORD Value dialog box, click Decimal.
  6. Modify the value of the Value data box as required, and then click OK.
Note This method changes the Windows registry setting for all applications that use the Microsoft Jet database engine version 4.0.

Method 2: Use the SetOption method to temporarily change MaxLocksPerFile

Note The sample code in this article uses Microsoft Data Access Objects. For this code to run correctly, you must reference the Microsoft DAO 3.6 Object Library. To do so, click References on the Tools menu in the Visual Basic Editor, and make sure that the Microsoft DAO 3.6 Object Library check box is selected.

The SetOption method temporarily overrides the default number of locks per file. You set the default number of locks per file when you set the MaxLocksPerFile registry key. You set the new value by using the SetOption method. The new value is valid until you close the DBEngine object. To use Method 2, follow these steps:
  1. Open Microsoft Access.
  2. Open a database, and then press Alt+F11 to launch the Visual Basic editor.
  3. On the Microsoft Visual Basic -<Database Name>-[<Module Name> (Code)] window, click Immediate Window in the View menu.
  4. In Immediate Window, enter the following code.
    DAO.DBEngine.SetOption dbmaxlocksperfile,15000
  5. Press the ENTER key to run the line of code.

    Note This temporarily sets the MaxLocksPerFile value to 15,000.
To process large transactions, set the MaxLocksPerFile value to meet your requirement, and then run the transactions in the session.

Changes you make to the MaxLocksPerFile setting by using the SetOption method are available only for the current session.


Ini pengalaman pribadi saat melakukan import dari file excel ke database Ms Access 2007. :)
 
Copyright 2010 catatan si b4r12y
Flash Blue Blogger template by b4r12y